Wednesday, November 8, 2017

Attic Access OR Bats in our Belfry

You might already think that we have bats in our belfry, as they say, but I promise that WE don't think we're crazy. Our plans to have the old knob and tube wiring replaced dictated the order of operation for other things. For instance, dropping the ceiling in the basement would be required in order to string the new wiring for outlets. So, before we installed the new garage door I demolished the garage. Also, we had black mold in a part of the basement due to a leaky water supply shutoff valve, so I purchased an air purifier, a mold remediation solution, and suited up to carefully remove the drywall and secure it in thick plastic bags for disposal. Having addressed the mold in the wall, it only made sense to also pull down the ceiling for the needed access for the electrical job.

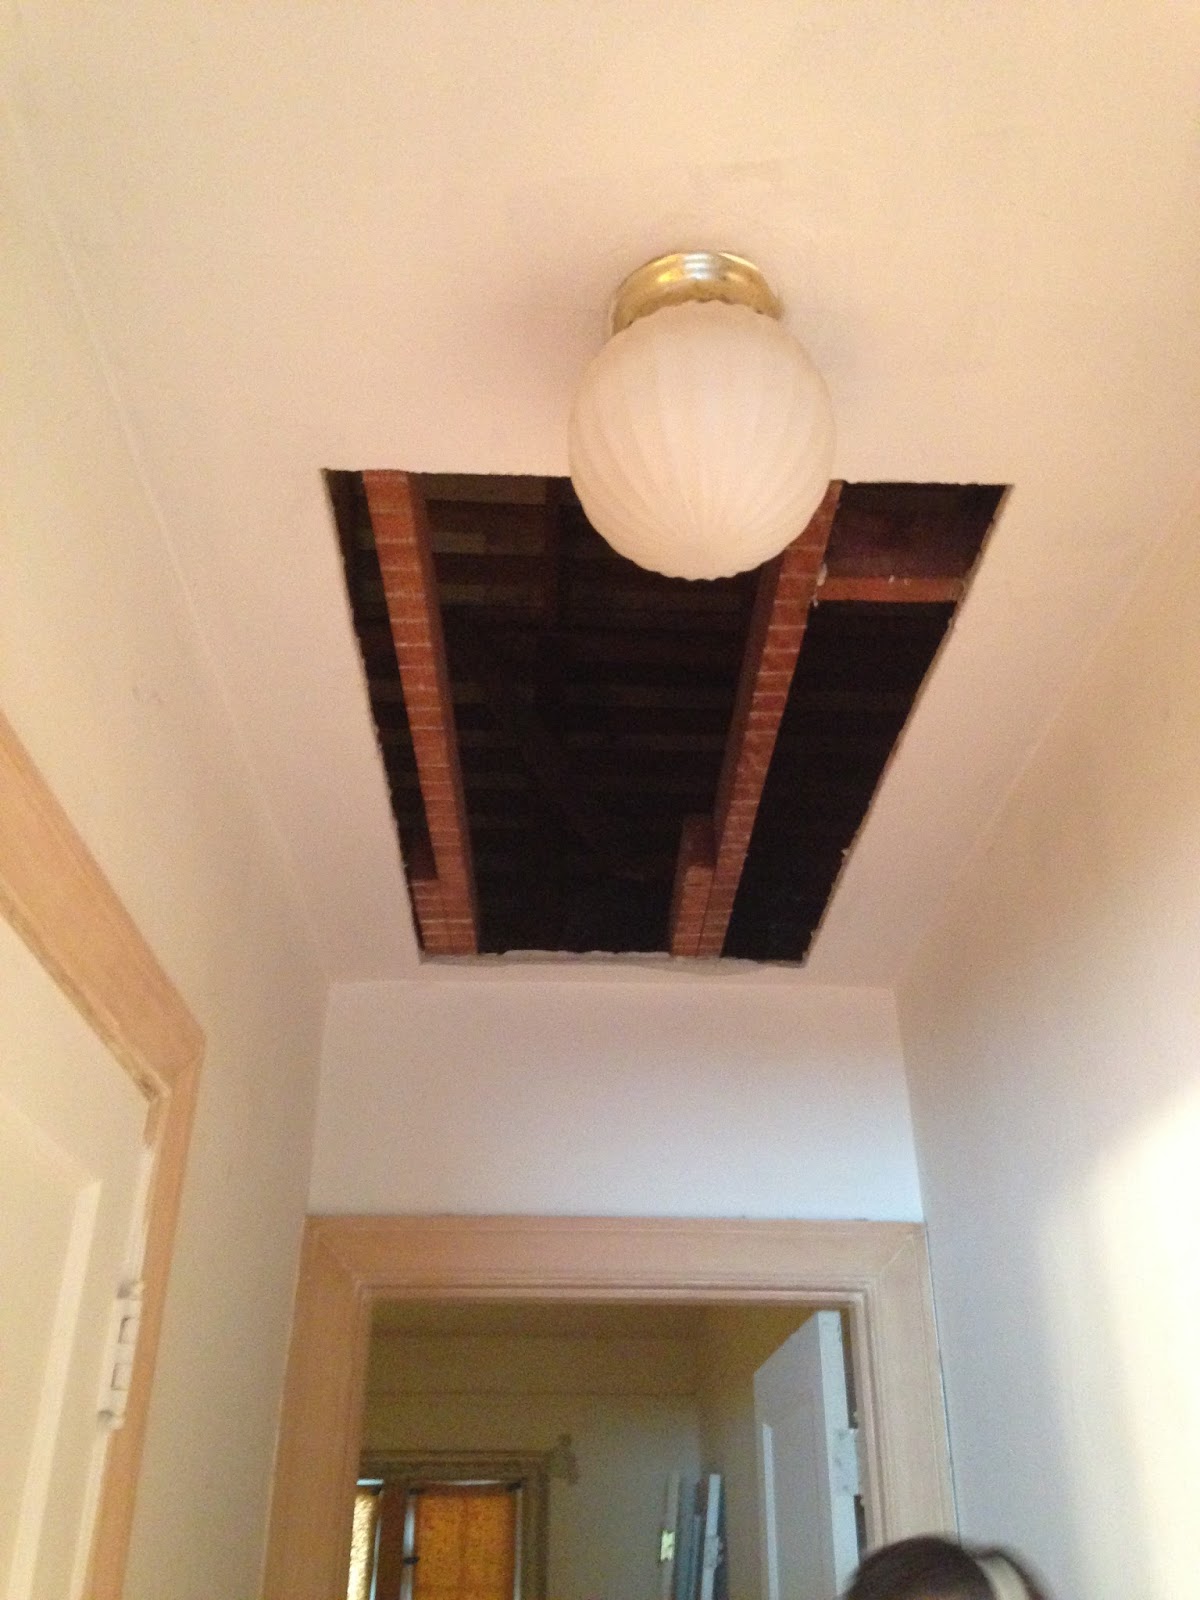
Similarly, we needed to consider attic access for wiring the ceiling lights. The only access to our HUGE attic was a small-ish access hole in the ceiling of the closet in the front bedroom. If one were to actually use the closet, she wouldn't be able to get up through the hole. Wouldn't it be GREAT to be able to access the attic for potential storage down the road? With some careful measuring and research to find the smallest attic ladder available, we determined that we could close up the hole in the closet in favor of an attic ladder in the hallway. There was no point in refurbishing the bedroom and closet until we patched up the attic access, and if we were going to patch up the hole, we might as well install the new access ladder.

Before: Do you see where it will go?
Before: Clearing the space in the attic.
As you can see in the photo, I had already started stripping the trim in anticipation of working in the hallway. I worked on this for a couple hours a night, with the goal of finishing one door frame a week. THERE ARE SIX DOORS IN THE HALLWAY!!! Sorry for the outburst...I just needed to emphasize how ridiculous that is.

Make hole, demo plaster.
Nice hole!
Nick figured out the precise measurements and marked the hole. He used a jig saw to cut through the lathe and plaster and a hammer and crow bar to knock down the plaster. Demolishing plaster overhead is the worst--it falls right into your face. Blech!

New framing.
Framing in action.
We knew that at some point we'd want to lay down a floor in the attic to make the space usable. However, Nick determined that we would not be able to get full 8' x 4' sheets of plywood into the attic once the ladder was installed due to the angle of the ladder and the limited space in the hallway. So, before the ladder went in, we bought a bunch of plywood and SHOVED it up the hole. This was SO much harder than you can imagine. One of us had to serve a as Receiver in the attic and the other had to be the Hoister on the ground. The Hoister had to lift up the plywood high enough for the receiver to take over. As I recall, I was the Hoister; a position earned after failing as the Receiver, which required more strength. 

Taa daa! Future floor. 
To be continued...


Wednesday, November 1, 2017

Welcome!

The garage door constituted a lot of eyeball real estate in that replacing it made a big difference in the overall appearance of the house. The exterior of the house had the power to control exactly how I felt about myself. Without a nice yard and entry, I was without pride. Next up: the front door. The light that shone through the splits in that old door, shot directly into my soul and showcased my embarrassment.
Old threshold and trim. Yuck!
This is not inviting.
We researched Tudor entries and stained glass windows and fell in love with a reproduction door sold in the UK. We didn't want our door painted and weren't going to have it shipped over the ocean, which meant that we needed to get creative.
Inspiration.
When it comes to doors in Seattle, there's really only one major player in town and they are THE WORST. I won't name them here, but you can  do an Internet search for doors in Seattle and piece it together. Let me tell you, the staff is rude, they give poor advice, and are wholly unreliable. Nevertheless, we determined that with precise instruction, it would be fine. We took in a sample of our mahogany trim that we hoped to match along with a photo of our inspiration and detailed drawings of the proper arch of the window and molding profile for the drip cap and dentil shelf. We  ordered a mahogany door along with the molding pieces. When the door was ready, we discovered that the mahogany was an entirely different, much darker varietal that would never match our trim even with the right mixture of stain. Additionally, the drip cap and dentil shelf had the wrong profile. So much for detailed instructions overpowering ineptitude. A bit of nastiness later, and the door store agreed to re-do our door in fir so that we'd be able to stain it to our liking. At this juncture, they admitted that they could not create the drip cap and dentil shelf we wanted. I guess they thought we wouldn't notice before...think again, Frank.

Nick contacted several lumber milling companies and selected one that could do the drip cap and dentil shelf. Next, we visited a reputable stained glass company and began work on our design. With creative direction from Nick and the expertise of the designer at the store, we landed on a design that everyone was happy with.

Nick stained the door.
New hardware.
Nick and his trusty assistant (ahem!) installed the door. Upon ripping up the old door frame, we discovered that the only thing really holding it in place was the brick molding. Nick created proper blocking for the frame to anchor into and I primed and painted the new door frame and molding. Although the old door handle was actually pretty neat, it wasn't quite right for our new door, so we ordered a new brass handle that met our liking and Nick used a chemical treatment to give it a patina. My self esteem increases one point every day that I go in and out of this door! It took us months to get this just right and Nick worked hard on the design, staining and installation. What a guy!

Fini.


Thursday, October 26, 2017

Garage Door: Foundation and Framing

Continuing off from the last post...Nick created a detailed plan for how to extend our foundation and frame it to specification. As I recall, he installed some rebar or bolts into the existing foundation so that the new extension would have something to hold it to the old. He picked up special brick molding and lumber pieces that I primed and painted in advance. This project occurred in December, so it was rainy and cold outside, necessitating that the painting occur indoors in advance.

It took the better part of a day to demo the old framing and create the form and support for the new foundation. That put us into the evening by the time we were ready to pour the concrete. We didn't have a great plan for how to hold the concrete frame in place, so I used some old lumber propped against the opposite side to push against the weight of the concrete inside the form. Once done, Nick quickly installed some blocking around the bare frame so that there was something we could screw the old wood door into.

Mixing concrete at night.
New foundation.
A couple days later, we worked together to install the new framing.

Shortly thereafter, the garage door guy came and made quick work of installing the new door. He was impressed at Nick's handiwork, which always validates the hard work. You'll see in the below photo that the garage guy failed to get the correct color for the weather guard and had to come back later and replace the white piece with an almond color that perfectly matched our trim.

Notice the patched-in brick at right.
Good helper.

Saturday, October 21, 2017

Garage Door - Selection and Painting

Although we took a bit of a detour on the Back Bedroom series, we're actually continuing on with a theme of securing the exterior of the house. In Seattle's rainy climate, the war against water is a first priority. 

When we closed on the house and paid the outstanding utility bills so that the power could be turned on, it was a great surprise that the old garage door opener actually worked. The old single panel wood door was rotting at the bottom and did not seal properly against the floor. As a result, water could easily flow into the house. The new drain that we had installed when the sewer line was replaced was a great help against water intrusion, but the door still needed to be replaced.

Old door not lookin' so good.

Much garage door research ensued. In the end, we chose a door that would mimic the original carriage-style door, but would operate as a modern door. There are several vendors that make doors a bit like this, but we weren't always happy with the proportion of the windowed section to the rest of the door, or with the way the windows were installed, for that matter. It just wasn't a convincing facsimile.

Before painting.
After painting.
Two-toned look.
We wanted the door to match our paint scheme, which meant we had to paint it ourselves. It is an insulated fiberglass door, which Nick painted with our regular exterior latex paint. Our sales rep recommended frosted glass for the windows, but we wanted to be able to see out of the garage and decided on clear glass. Basements can make a person feel claustrophobic, so I am glad we went with the clear glass. 

No project is perfectly easy, and this project required reworking the framing for the door. Unfortunately, the available dimensions of the door were such that the framing would be wider on one side than the other in order for there to be room for the rails on the inside. Nick felt strongly that this would look silly. In order to correct the problem, we would have to pour concrete to extend the foundation and then patch in some brick to match the rest of the house. Hard enough on it's own, we also had to consider how to secure our home while working on this multi-day project. Oy!

Tuesday, October 17, 2017

Back Bedroom: Part 7 - The Finale

In order to consider the back bedroom complete, it requires a few important finishes. The hardest of these was the restoration of the heat register. The heat registers had all been painted gold, which might have been fine, but they were never protected during previous room paintings, so they were splattered and dingy looking. I stripped the register using a variety of methods to see what would work: heat gun (not so much), steel wool and steel brush (not great), simmering in water (somewhat effective but time consuming and difficult to find a large enough pot. Really, the best method was just good ol' hand sanding using emery cloth.

The "before" photo.
Stripped and ready for painting.
Primed.
Painted and installed.

Push button switches were installed along with brass switch plates. This is a small detail that makes a big difference. It's fun to have these reproduction switches. We wonder why the push buttons were abandoned for other styles. Was it too much effort to push rather than flick? We also painted the inside of the closet, which we kept smooth rather than texturing and installed an adjustable closet organization system.

We have enjoyed the search for perfect lighting. It's fun to research fixtures from the era and find just the right thing for each room.

Spray painted, then hand painted detail.
For sale. 
Nick restored the original two-bulb light and we used that for awhile, but later we found two matching three-bulb lights, which we now use. I hope to post the restored light on eBay someday soon.
New light (original to era) with Edison bulbs. 
The room is finished!


Tuesday, October 10, 2017

Back Bedroom: Part 6 - Alive with Color

I joke that I only really see eight colors in this world. Basically, red, orange, yellow, green, blue, purple, black and white. However, when it comes to choosing paint for a room, my oh my, it's a different story! The criteria for the bedroom color was something like this: 1) NOT BLUE.

Given the whole "Insanity Box" situation of the prior blue walls and ceiling, it didn't seem reasonable to even visit the blue family. We planned to do a warm grey, but the six samples we painted on the wall were all not right for their own reasons. Grey can look too dark, too blue, too purple, and too silver, among other things. It seems that some colors change more with the lighting than others, and we struggled with grey. When in doubt, think it out!

Please remember that these are my own judgements of color and I trust that if your bedroom is one of these colors, it's perfect and you chose the exact right shade/hue and I love it.
  • Red/pink: No--too angry, too hungry, or too girlie.
  • Orange: No.
  • Yellow: No--the kitchen is yellow.
  • Green: No--we have green slated for another room.
  • Blue: No--because of the Insanity Box.
  • Purple: No--I am biased against purple. It's actually one of my least favorite colors. Non-negotiable. No purple.
  • Black: No--too sad.
  • White: No--I grew up with white walls...time for color!
  • Beige: No--slated for other rooms. Yes, I learned a new color since the start of this post.
*Sigh* I think Nick said the words first. As dangerous as it might have been to suggest it, he posed, "What about blue?" Before I could object he defended, "There are lots of different blues--we just need to find the RIGHT blue. And, we aren't going to paint the ceiling the same color and the trim isn't black. I think it will look good." For a time, one of our favorite stores, Rejuvenation, had partnered with a paint company and had a "Mercantile Collection" of colors. We grabbed every single paint swatch and roughed out a plan for our house based upon those. We pulled out the stack of swatches and chose two that we thought had promise. The paint store did a color match from the swatch and I'll be darned if we didn't find a blue that we really liked.

The new blue! I like it.

Wednesday, October 4, 2017

Back Bedroom: Part 5 - Repairing Cracks, Texturing, Priming


With the exterior work complete, the next step in the back bedroom project was to strip the trim and repair the plaster cracks. I stripped the trim with my trusty heat gun and then hand sanded. To repair the plaster, I scraped each side of the crack holding my tool at about a 45 degree angle. This gets out loose material and creates a wider ditch for the repair material. Then I primed the cracks, which seals in the sandy plaster. Once dry, the cracks receive mesh tape before a mixture of drywall mud and plaster of Paris is applied. The addition of plaster of Paris makes the mud harder than drywall mud alone and is supposed to help delay/prevent cracking again. Old plaster is prone to cracking, which is an eventuality that I've accepted, but haven't experienced yet (knock on wood).

Stripped and sanded trim.
Repairing cracks.
After crack repair, the room was primed and Nick skim coated the ceiling using a loose mix of drywall mud. We rolled the mud on with a paint roller and he combed it smooth with a "Magic Squeegee". A Magic Squeegee is a 16 inch squeegee. The magic is really just that someone thought to use the squeegee for skim coating instead of window washing. It takes a bit of practice, but worked pretty well for these two amateurs. We were later affirmed when we hired a professional to skim coat the cove ceilings in the living and dining rooms and he showed up with the same tool.

The living and dining rooms were the only areas in the house that had textured walls. Other rooms looked like they had once been wallpapered and later painted. In the back bedroom, the walls AND the ceiling had a slight texture indicative of wallpaper.

Texturing - action shot.
Texturing complete. The Insanity Box is gone!
We did our best to replicate the heavy knock-down texture in the living and dining rooms. We used a single crow's foot brush dipped in drywall mud and knocked it down with a trowel while still wet. The texture isn't quite as heavy as in the living and dining rooms, but I actually like it better.

A sigh of relief. This is a good place.
The blue room was loud. As soon as all of the blue was covered, it became a quiet, peaceful place. It felt like someone found the switch and flicked it off. Sudden silence. 

Stay tuned for the next installment when we choose a color!