Monday, November 27, 2017

Finishing the Hallway: Circle the Differences


As a transitional space, a hallway is uninteresting. But, as you've already seen, a lot of changes happened here. This area was so boring to me in its original state that I failed to take a true "before" photo!
SNORE!
Ooh la laa...is that a laundry chute??
I love the final product! The additions of the attic ladder, laundry chute, and picture rail give the eye  much more to take in. The picture rail turns the area into a tiny gallery, which can easily change on a whim. Like the back bedroom, we textured the walls using a knock-down method. The  musty smelling coat closet received a partial make-over and a coat of shellac-based primer that sealed in the stench and cleared the air. Yay! Interesting to note, we had to demolish a stud bay in the closet when the electrical was updated. My forward-thinking husband used the opportunity to add an electrical outlet and cable/phone jacks so that we could neatly store our wireless router hidden away. The outlet is at about 5 feet so that the router can sit on the shelf without wires strung down the wall.

Vintage lighting - so much life to go!
Switches and stitches.
With the addition of beautiful vintage era lighting and push-button switches, the hallway is complete! If you are REALLY observant, you've noticed that all the doors received new brass hinges to replace the old steel hinges that had been painted. The black and white photos on the wall are some of my favorite images from both my mom and dad's family albums. The embroidery piece traces back to my great grandmother, though its creator is somewhat questionable. Read about that on my mom's blog here.

Standing in the bathroom entrance (for reference).


Saturday, November 18, 2017

Chute! There's Laundry on the Floor

Have you ever lived in a small house with small rooms and small closets? Where did you keep your dirty laundry? Perhaps it was the most logical place...the bedroom floor. We have been frustrated by the difficulty of keeping order with respect to laundry. The washer and dryer are in the basement and there isn't much  space for a hamper upstairs. During the time that we used the basement bathroom things were a little better because we kept the hamper in the bathroom where we most often changed clothes. But, we knew that someday we'd have a proper bathroom upstairs and would need a laundry solution. Occasionally, you'd find Nick or me standing alone in the basement staring at the ceiling dreaming of where we might be able to install a laundry chute. We equally concluded that there was just one place that would work, and that was in the hallway. So, before any further work, it only made sense to build the chute since it would involve some destruction to the wall.

Nick carefully pried the baseboard off the wall and marked where the chute would go, giving consideration to where he calculated the studs to be.

Remove baseboard, cut starting hole.
Nick saws.
The jig saw works well for cutting nice straight lines with minimal collateral damage to the wall. We found the perfect sized cabinet door at a construction salvage shop. It has a similar profile to our existing doors and no major dings. With some sanding and painting, it'll be perfect!

Not too bad!
Salvaged cabinet door.
Next, we got some sheet metal and a tool that helps bend it to make perfect corners. The tool is basically two steel rectangles welded together with a gap between them. You slip the metal into the gap and bend. I called my brother, a sheet metal expert, and inquired about the best tool for cutting the metal. The sheet metal scissors are $20 or $30, so we wanted to get it right.

Nick's sheet metal construction.
My, what nice seams you have!
Nick figured out exactly how to build the chute so that there would be no visible seams where the sheet metal pieces are joined and no sharp edges that might catch on our clothing. His ability to construct things so perfectly is amazing to me!
Perfect fit.
Voila!
The chute was then placed in its new home and the baseboard put back in place. The final photo represents a couple of imperfections not worth pointing out, but that will be corrected in time. We haven't actually used the chute yet because it isn't connected to anything in the basement. Although it's pretty narrow, we ensured that we'd still be able to pass our garments through. I love how it came out! It is at home in our hallway.

Sunday, November 12, 2017

Attic Ladder: The Last Step (Ha!)

Installation instructions for attic ladders say that it can be done by one person, which seems incredible to me. But truly, Nick was able to do the next part all by himself. He installed some wood boards across the open span so that the ladder could rest level with the ceiling while he positioned it to his liking. Then, he shimmed the gap and screwed the ladder into the framing. Once complete, I came along and plastered the edges that had gotten mangled in the process and filled in the small gap between the ladder unit and the framing.

Bracing for installation.
Secured. Plaster touch-up.
The plaster touch-up wasn't really necessary since we put trim around the ladder to match the doorways, but we feel better having done it anyway. The door is made of melamine, which I'm not a fan of, but there wasn't any other choice. The reason why I don't like it is that unlike wood, if it gets dinged or marred, it's very difficult to patch and repair. It had a corner that was slightly squished, but I was successful in making a decent repair. It also painted up to satisfaction, so it works! 
Melamine door - pre-paint.
Post paint w/trim. Happiness!
I think it looks really sharp with its white trim and matching door. You'll notice several things in the final photo that I haven't talked about yet. Worth mentioning is the neat little exposed bulb light fixture that replaced the larger glass shade fixture at left. We put in another matching light around the corner in the hallway, which makes it a happier, less ominous place. 


Wednesday, November 8, 2017

Attic Access OR Bats in our Belfry

You might already think that we have bats in our belfry, as they say, but I promise that WE don't think we're crazy. Our plans to have the old knob and tube wiring replaced dictated the order of operation for other things. For instance, dropping the ceiling in the basement would be required in order to string the new wiring for outlets. So, before we installed the new garage door I demolished the garage. Also, we had black mold in a part of the basement due to a leaky water supply shutoff valve, so I purchased an air purifier, a mold remediation solution, and suited up to carefully remove the drywall and secure it in thick plastic bags for disposal. Having addressed the mold in the wall, it only made sense to also pull down the ceiling for the needed access for the electrical job.

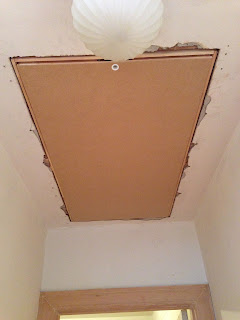
Similarly, we needed to consider attic access for wiring the ceiling lights. The only access to our HUGE attic was a small-ish access hole in the ceiling of the closet in the front bedroom. If one were to actually use the closet, she wouldn't be able to get up through the hole. Wouldn't it be GREAT to be able to access the attic for potential storage down the road? With some careful measuring and research to find the smallest attic ladder available, we determined that we could close up the hole in the closet in favor of an attic ladder in the hallway. There was no point in refurbishing the bedroom and closet until we patched up the attic access, and if we were going to patch up the hole, we might as well install the new access ladder.

Before: Do you see where it will go?
Before: Clearing the space in the attic.
As you can see in the photo, I had already started stripping the trim in anticipation of working in the hallway. I worked on this for a couple hours a night, with the goal of finishing one door frame a week. THERE ARE SIX DOORS IN THE HALLWAY!!! Sorry for the outburst...I just needed to emphasize how ridiculous that is.

Make hole, demo plaster.
Nice hole!
Nick figured out the precise measurements and marked the hole. He used a jig saw to cut through the lathe and plaster and a hammer and crow bar to knock down the plaster. Demolishing plaster overhead is the worst--it falls right into your face. Blech!

New framing.
Framing in action.
We knew that at some point we'd want to lay down a floor in the attic to make the space usable. However, Nick determined that we would not be able to get full 8' x 4' sheets of plywood into the attic once the ladder was installed due to the angle of the ladder and the limited space in the hallway. So, before the ladder went in, we bought a bunch of plywood and SHOVED it up the hole. This was SO much harder than you can imagine. One of us had to serve a as Receiver in the attic and the other had to be the Hoister on the ground. The Hoister had to lift up the plywood high enough for the receiver to take over. As I recall, I was the Hoister; a position earned after failing as the Receiver, which required more strength. 

Taa daa! Future floor. 
To be continued...


Wednesday, November 1, 2017

Welcome!

The garage door constituted a lot of eyeball real estate in that replacing it made a big difference in the overall appearance of the house. The exterior of the house had the power to control exactly how I felt about myself. Without a nice yard and entry, I was without pride. Next up: the front door. The light that shone through the splits in that old door, shot directly into my soul and showcased my embarrassment.
Old threshold and trim. Yuck!
This is not inviting.
We researched Tudor entries and stained glass windows and fell in love with a reproduction door sold in the UK. We didn't want our door painted and weren't going to have it shipped over the ocean, which meant that we needed to get creative.
Inspiration.
When it comes to doors in Seattle, there's really only one major player in town and they are THE WORST. I won't name them here, but you can  do an Internet search for doors in Seattle and piece it together. Let me tell you, the staff is rude, they give poor advice, and are wholly unreliable. Nevertheless, we determined that with precise instruction, it would be fine. We took in a sample of our mahogany trim that we hoped to match along with a photo of our inspiration and detailed drawings of the proper arch of the window and molding profile for the drip cap and dentil shelf. We  ordered a mahogany door along with the molding pieces. When the door was ready, we discovered that the mahogany was an entirely different, much darker varietal that would never match our trim even with the right mixture of stain. Additionally, the drip cap and dentil shelf had the wrong profile. So much for detailed instructions overpowering ineptitude. A bit of nastiness later, and the door store agreed to re-do our door in fir so that we'd be able to stain it to our liking. At this juncture, they admitted that they could not create the drip cap and dentil shelf we wanted. I guess they thought we wouldn't notice before...think again, Frank.

Nick contacted several lumber milling companies and selected one that could do the drip cap and dentil shelf. Next, we visited a reputable stained glass company and began work on our design. With creative direction from Nick and the expertise of the designer at the store, we landed on a design that everyone was happy with.

Nick stained the door.
New hardware.
Nick and his trusty assistant (ahem!) installed the door. Upon ripping up the old door frame, we discovered that the only thing really holding it in place was the brick molding. Nick created proper blocking for the frame to anchor into and I primed and painted the new door frame and molding. Although the old door handle was actually pretty neat, it wasn't quite right for our new door, so we ordered a new brass handle that met our liking and Nick used a chemical treatment to give it a patina. My self esteem increases one point every day that I go in and out of this door! It took us months to get this just right and Nick worked hard on the design, staining and installation. What a guy!

Fini.